Wednesday, October 26, 2011
I've brought the duck back
A few weeks ago, I met a most interesting duck at a local state park. I watched him as he would wait for fishing boats to be offloaded and then he would follow the boaters around the gentle cove but never venture out for to the main river. Around the cove he would swim, he was pretty fast about it. Finally, he came over to where I was at and I got to take a good look at him.
He's really a beauty--all black with feathers that are iridescent in the sun. His bill reminded me of a Mallard Duck, so I'm not sure if he's part domestic duck, part Mallard or what. There is a duck called an American Black Duck--but they don't look anything like this.
This duck got me thinking about bringing out an old pattern that I had done of a duck a few years back. I knew I wanted to make some changes to it before doing another. I played with the pattern a bit--made the cattails larger, changed the position of some of the grass and made those parts larger as well. One thing I wanted to do with the new duck was to use brighter colors for some of the features. The last duck I had done had darker colors which made it difficult to photograph.
The pattern I had developed was on a regular sized piece of paper-I enlarged it and got to making my copy. I thought it would be interesting to do something different with the eye. For that I chose to use a black glass glob, a/k/a glass gem, half marble. They are a bit larger than needed---I grinded the glob on all sides to fit and took a bit off the bottom of it as well so it wouldn't stick up way higher then the glass.
It was really very fun choosing all of the different colors for this piece. I thought also to use denser glass on the main features with the thought that this might be an interesting piece to hang on a wall since not everyone has big windows for big suncatchers.
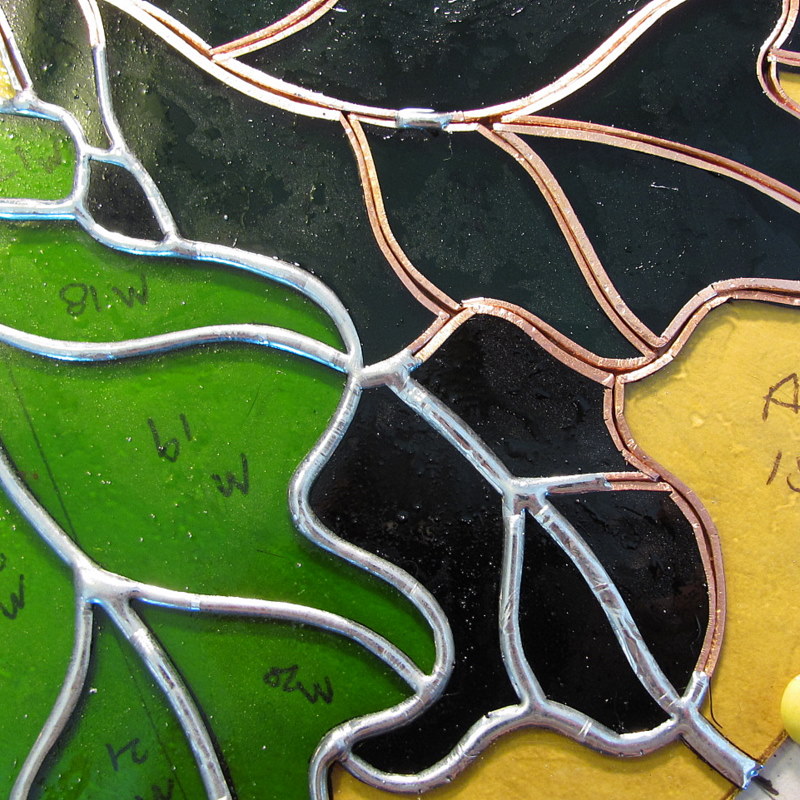
After days of glass choosing, cutting, grinding the pieces and foiling them I was finally ready to solder everything together. This is an exciting time because once I have one side soldered I'll finally be able to pick the piece up and see what everything looks like together. The reverse side is then soldered and lead channel wrapped all the way around the piece.
I hung the duck up inside and thought it looked pretty good this way. It was then that I realized that I was not completely done~~~I still needed to hand paint some features onto the duck.
A little nostril and some lines by his webbed feet are what I added. I never realized how important this nostril is until I spent time watching that black duck. He seemed to blow air out of it when he had his bill in the water--kind of what people do when they swim.
I'm very happy with the outcome of this new Mallard Duck design, available for sale in my Etsy shop. This suncatcher panel measures 15 inches diameter, 38 cm.
Sunday, September 4, 2011
I've been visited by royalty
Royalty~~in the form of this fantastic Regal Moth caterpillar, Citheronia regalis (Fabricius). I've seen caterpillars that are stunning and some that are large--but I've never seen such a big beauty as this one. The outside cats had brought it to my attention~~well, not really, actually I check on them throughout the day to make sure that they are alright and haven't gotten themselves into any trouble. I peeked outside and could tell that they had something large, green and interesting. I was in for a real treat.
This caterpillar is also known as the Hickory Horned Devil~~one of its host plants in the hickory tree. Oaks along with various hickories make up the backbone of the woodlands in this area. After nearly 12 years of living in these woods I'm surprised that this is my very first encounter with one. More great information about this caterpillar and the moths that they become is located here.
I knew I had a great moth caterpillar in my hand but was unsure which specie it was, I set it down for a minute and ran inside to get the field guide along with a ruler to measure it. By the time I had made it back the caterpillar had wondered off to isolate itself from this entire ordeal that it had been put through. Sad to see it go, I was thankful for the opportunity to have seen it firsthand.
The field guide that I own was able to show me exactly what type of caterpillar I had just encountered and also the moth that it will eventually become. Since I enjoy posting my photos to Flickr I thought that I would take a look and see what other photos of the moth I would find there. I was really delighted to find a wonderful photo of the moth. With permission from the photographer, Myeyeongaia I've posted two wonderful photos of this winged beauty. The above a lovely female and below a couple in the midst of continuing the cycle of life.
Saturday, August 13, 2011
Stained Glass Rainbow Butterfly~~new and improved version
Last week I had begun working on a new version of a Rainbow Butterfly in stained glass. I had come up with the original idea a couple of years ago and have done a few versions of it. For this new design I changed things up a bit by adding a lot more detail in the wings of the butterfly and also adding swirls and curves to the background--to give the piece more of a feeling of movement.
As in the previous butterflies I chose to use a textured glass made by the Spectrum Glass Company called Rough Rolled. It has a sparkly texture that really shimmers with sunlight or even objects behind it that reflect light. For the background pieces I was able to piroot through my leftover scrap box searching for odd parts to use~~as it turned out I was able to use seven different textures to surround the butterfly.
This was the very last rainbow butterfly that I had done before making the changes that I did. When working on the one above the thought came to me that I really wanted the colors to flow from the center outward--the only way to get that to work was to add more pieces to the project--which of course involves a lot more cuts and a lot of small pieces to wrap with foil. Also, even though I love the deep purple that I used its such a difficult color for me to photograph that I figured that I shouldn't use it again for a butterfly.
Shown here with all of the pieces for the project cut and about half way through the process of foiling. Even though some of the pieces were/are tiny this step seemed to move relatively quickly.
Here it was ready to be soldered together. When doing a piece like this with tiny parts its real easy to get globby and sloppy with the solder. Remember to bring your patience to the soldering party.
Completed this butterfly measures 12 inches wide by 10 1/2 inches tall, about 30.5cm by 26.5cm. Available for sale in my Etsy shop.
Wednesday, August 10, 2011
A little bit of time for some exploration
There were lots of lovely water lilies close to the shore. I was glad to see them--they have been doing an extensive 'clean up' of the brushy areas in the park--the places that I love to explore. Good to know they didn't touch the lotus.
I just can't help but think of ET whenever I see one of these seed heads from the American Lotus. From the looks of broken off stems, somebody must like them and have picked them to take home.
Lots and lots of dragonflies flying about this afternoon. These two stop to take a break and seem to be sizing each other up.
Butterflies and more butterflies. This Spicebush Butterfly has definitely seen better days. Huge chunks of its wings were missing, but it didn't seem to have a problem flying from one buttonbush bloom to the next.
Last year, they had cut back these lovely buttonbush plants to the ground. Thankfully, they had let them grow back for this year~~the butterflies were all over them. Here a Tiger Swallowtail feeds alone...not for long.
This second one thought that the first one had an extra special flower and wanted a taste of it as well.
Such a short visit today~as it was time to head out I spotted this Great Blue Heron feeding close to shore in the shallows--looking for a tasty meal~~~maybe a small fish, maybe a frog. It stayed in place for a while--but not long enough while I fumbled with the settings on the camera. Just as I was about to take a shot at it, it decided to take off--it ended up being a pretty cool shot anyway.
Tuesday, August 9, 2011
Something a bit different~Abstract Blue and White Suncatcher
One I had all the pieces foiled and started the solder process, I thought to pull an old trick out of my hat by adding this solder effect. When the solder is hot, a wet sponge is smashed onto the solder lines creating this crinkly effect.
Two shades of blue along with white glass, a dark blue gem, two light blue gems and one clear gem all together in this abstract suncatcher~~available for sale in my Etsy shop.
This one of a kind piece measures 8 3/4 inches diameter, just over 22cm.
Looks interesting hanging on a wall as well.
Monday, August 1, 2011
Why did the turtle cross the road?
The shells of these turtles are just so beautiful. Such wonderful color and design.
When I first took an interest in the workings of nature and bought loads of books to learn about the wonderful creatures around me, one of them was a book on reptiles and amphibians, their life histories and such. Unlike mammals and most birds, reptiles show little outward signs of their gender. With box turtles, eye color can sometimes be a determining factor along with the shape of the upper shell. If the tail is visible, the male's are usually longer and wider than the females--although it would be difficult to compare without multiple samples. Here's a way to distiguish the two sexes. The underside of the shell, known as the planstron will be concave in males and flat in females. So--this one looks to be a boy.
These turtles have another wonderful design and that they can completely close themselves into their shells in case of danger--the planstrom is hinged to allow this.
Time to let him go. After a few minutes I moved him over to the other side for some peace and quiet. When moving turtles out of harms way--most likely a roadway, its important to move them in the direction that they were travelling--not back where they were since they will set out again. There's a reason they were heading the way they were.
Labels:
biodiversity,
Eastern Box Turtle,
reptile,
tennessee nature
Friday, July 22, 2011
Stained Glass Oak Leaves Project~a woodland celebration
After the lead came frame was added, this piece measured at 13 3/4 inches diameter, right around 35cm.
I last posted about this piece a few days ago while I was half way through the process of foiling the pieces. Let's take a look at the remaining steps for this project.
All the pieces have been wrapped with copper foil, except for the outside edge which will be lead came framing a few steps from now. At this stage I'll pin the piece down with thumbtacks to keep it in place while the pieces are soldered together. I noticed that one piece of this puzzle was taking up a little bit more space then it was intended to have--it was taken out and a little bit of the glass removed so that it would fit better against the neighboring pieces.
Time to glue the puzzle together, or in this case its solder. A liquid chemical acid (left) will be brushed onto all the copper foiled edges. A lead/tin solder (right) will be what binds the pieces together and creates the joints.
Using a hot solder iron (right) that melts the solder to a high temperature, a bead is run over the copper foil joints that have been treated with the acid flux--by chemical reaction the solder is attracted only to the foil and the parts are then bound together.
Its important to keep the solder and the iron moving slowly yet continuously over the pieces as to avoid globs of solder which can occur easily especially where several pieces join together.
One side soldered completely. Lots and lots of crud left over from the solder process--this will be cleaned off thoroughly later, although a gentle wiping away of some of the gunk is in order. Now, the piece will be turned over and the back side will be completely soldered as well. BUT---this is the fun part~~~the piece can finally be picked up and looked at.
This will be the first time and I've seen what all of the hours of work have come to. Very very happy with things so far!
Back side soldered, the piece can now be cleaned thoroughly for the first time. Here, I'm using a powder called whiting, which is calcium carbonate. Brushed into the solder joints, it helps to absorb and residue leftover from the soldering process. It also cleans the glass as well.
Time to wrap it up. For the outer ring, I'm using what's called lead came--this is U shaped came as it resembles the letter "U". There's also "H" came that is used in leaded glass work--I don't use this in anything I do. There are a couple of different ways to purchase came, I've gone with the most economical method sold rolled onto a spool.
A measurement is taken of the circumference of the piece~~here right around 43 inches (just under 109cm) will be enough to wrap the outside. A length is cut off the roll of lead, laid out smooth and flat and cleaned off to remove any oxidation that might have formed.
There's a couple of different ways to approach wrapping the piece with the came. Mine is to face the U channel of the lead in an upward position and then to gently roll the center glass into the channel. Here, its been rolled and tacked down to a board using horse shoe nails to hold all in place for the next step.
Where the copper foiled joints of the glass meet the lead came outer ring I connect the two with solder to connect the ring and keep it in place. All of the joints are soldered this way on the backside only. On the front facing side I only solder the ring where the two ends have met and also where the rings that hold the piece will be put in place.
For smaller pieces its fine to attach a simple ring to for the purpose of hanging. For a larger and much heavier piece such as this I've created a ring with a 'tail'. The 'tail' end will be embedded with solder into the solder joint. This will create a hanging loop that is virtually impossible to remove short of cutting it off or reheating with an iron and removing.
To tone down the shiny silvery solder lines I've applied black patina to the metals. I've found that the easiest way to patina a piece is with a sponge dipped into the liquid patina then applied onto the solder lines and lead came. The excess is wiped away and the patina is allowed to set up for a short amount of time. To remove the residue from this step I'll wash the entire piece with soapy water, a sponge and a toothbrush run on all the solder joints paying special attention to heavily angled joints since this is where anything that doesn't belong tends to hide.
~~~~~~~~~~~~~~~~~~~~~~~
I've got another leaf based design that I'll be starting on tomorrow. The leaves are much simpler in form and the overall size will be a bit smaller.
Subscribe to:
Posts (Atom)