The Stained Glass Oak Leaves project that I've been working on has finally been completed. I'm absolutely delighted with the outcome, especially considering that I did not know how the three shades of green glass that I used would 'work' together--they really did and I would use them together on other projects. Looks fantastic hanging in my workshop window, the leaves are very lively and seem to move due to the Waterglass that I used for them.
After the lead came frame was added, this piece measured at 13 3/4 inches diameter, right around 35cm.
I last posted about this piece a few days ago while I was half way through the process of foiling the pieces. Let's take a look at the remaining steps for this project.
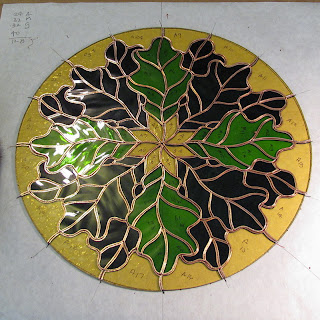 All the pieces have been wrapped with copper foil, except for the outside edge which will be lead came framing a few steps from now. At this stage I'll pin the piece down with thumbtacks to keep it in place while the pieces are soldered together. I noticed that one piece of this puzzle was taking up a little bit more space then it was intended to have--it was taken out and a little bit of the glass removed so that it would fit better against the neighboring pieces.
 Time to glue the puzzle together, or in this case its solder. A liquid chemical acid (left) will be brushed onto all the copper foiled edges. A lead/tin solder (right) will be what binds the pieces together and creates the joints.
 Using a hot solder iron (right) that melts the solder to a high temperature, a bead is run over the copper foil joints that have been treated with the acid flux--by chemical reaction the solder is attracted only to the foil and the parts are then bound together.
 Its important to keep the solder and the iron moving slowly yet continuously over the pieces as to avoid globs of solder which can occur easily especially where several pieces join together.
 One side soldered completely. Lots and lots of crud left over from the solder process--this will be cleaned off thoroughly later, although a gentle wiping away of some of the gunk is in order. Now, the piece will be turned over and the back side will be completely soldered as well. BUT---this is the fun part~~~the piece can finally be picked up and looked at.
 This will be the first time and I've seen what all of the hours of work have come to. Very very happy with things so far!
 Back side soldered, the piece can now be cleaned thoroughly for the first time. Here, I'm using a powder called whiting, which is calcium carbonate. Brushed into the solder joints, it helps to absorb and residue leftover from the soldering process. It also cleans the glass as well.
 Time to wrap it up. For the outer ring, I'm using what's called lead came--this is U shaped came as it resembles the letter "U". There's also "H" came that is used in leaded glass work--I don't use this in anything I do. There are a couple of different ways to purchase came, I've gone with the most economical method sold rolled onto a spool.
 A measurement is taken of the circumference of the piece~~here right around 43 inches (just under 109cm) will be enough to wrap the outside. A length is cut off the roll of lead, laid out smooth and flat and cleaned off to remove any oxidation that might have formed.
 There's a couple of different ways to approach wrapping the piece with the came. Mine is to face the U channel of the lead in an upward position and then to gently roll the center glass into the channel. Here, its been rolled and tacked down to a board using horse shoe nails to hold all in place for the next step.
 Where the copper foiled joints of the glass meet the lead came outer ring I connect the two with solder to connect the ring and keep it in place. All of the joints are soldered this way on the backside only. On the front facing side I only solder the ring where the two ends have met and also where the rings that hold the piece will be put in place.
 For smaller pieces its fine to attach a simple ring to for the purpose of hanging. For a larger and much heavier piece such as this I've created a ring with a 'tail'. The 'tail' end will be embedded with solder into the solder joint. This will create a hanging loop that is virtually impossible to remove short of cutting it off or reheating with an iron and removing.
 Here the hanging loop his shown embedded into the solder joint.
 To tone down the shiny silvery solder lines I've applied black patina to the metals. I've found that the easiest way to patina a piece is with a sponge dipped into the liquid patina then applied onto the solder lines and lead came. The excess is wiped away and the patina is allowed to set up for a short amount of time. To remove the residue from this step I'll wash the entire piece with soapy water, a sponge and a toothbrush run on all the solder joints paying special attention to heavily angled joints since this is where anything that doesn't belong tends to hide.
 I let the cleaned patina'd piece set overnight, the next day I polished all the joints to protect them using a couple of different carnauba based waxes which also cleans and the glass and gives it a nice sparkle.
 All the pieces have been wrapped with copper foil, except for the outside edge which will be lead came framing a few steps from now. At this stage I'll pin the piece down with thumbtacks to keep it in place while the pieces are soldered together. I noticed that one piece of this puzzle was taking up a little bit more space then it was intended to have--it was taken out and a little bit of the glass removed so that it would fit better against the neighboring pieces.
  Time to glue the puzzle together, or in this case its solder. A liquid chemical acid (left) will be brushed onto all the copper foiled edges. A lead/tin solder (right) will be what binds the pieces together and creates the joints.
 Using a hot solder iron (right) that melts the solder to a high temperature, a bead is run over the copper foil joints that have been treated with the acid flux--by chemical reaction the solder is attracted only to the foil and the parts are then bound together.
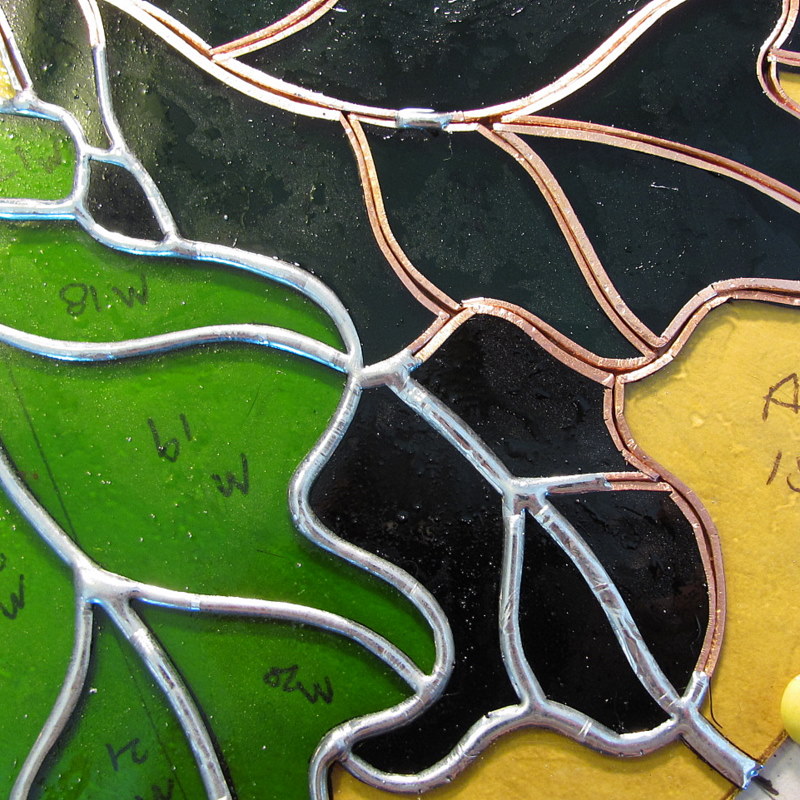 Its important to keep the solder and the iron moving slowly yet continuously over the pieces as to avoid globs of solder which can occur easily especially where several pieces join together.
 One side soldered completely. Lots and lots of crud left over from the solder process--this will be cleaned off thoroughly later, although a gentle wiping away of some of the gunk is in order. Now, the piece will be turned over and the back side will be completely soldered as well. BUT---this is the fun part~~~the piece can finally be picked up and looked at.
 This will be the first time and I've seen what all of the hours of work have come to. Very very happy with things so far!
  Back side soldered, the piece can now be cleaned thoroughly for the first time. Here, I'm using a powder called whiting, which is calcium carbonate. Brushed into the solder joints, it helps to absorb and residue leftover from the soldering process. It also cleans the glass as well.
 Time to wrap it up. For the outer ring, I'm using what's called lead came--this is U shaped came as it resembles the letter "U". There's also "H" came that is used in leaded glass work--I don't use this in anything I do. There are a couple of different ways to purchase came, I've gone with the most economical method sold rolled onto a spool.
 A measurement is taken of the circumference of the piece~~here right around 43 inches (just under 109cm) will be enough to wrap the outside. A length is cut off the roll of lead, laid out smooth and flat and cleaned off to remove any oxidation that might have formed.
 There's a couple of different ways to approach wrapping the piece with the came. Mine is to face the U channel of the lead in an upward position and then to gently roll the center glass into the channel. Here, its been rolled and tacked down to a board using horse shoe nails to hold all in place for the next step.
 Where the copper foiled joints of the glass meet the lead came outer ring I connect the two with solder to connect the ring and keep it in place. All of the joints are soldered this way on the backside only. On the front facing side I only solder the ring where the two ends have met and also where the rings that hold the piece will be put in place.
 For smaller pieces its fine to attach a simple ring to for the purpose of hanging. For a larger and much heavier piece such as this I've created a ring with a 'tail'. The 'tail' end will be embedded with solder into the solder joint. This will create a hanging loop that is virtually impossible to remove short of cutting it off or reheating with an iron and removing.
 Here the hanging loop his shown embedded into the solder joint.
 To tone down the shiny silvery solder lines I've applied black patina to the metals. I've found that the easiest way to patina a piece is with a sponge dipped into the liquid patina then applied onto the solder lines and lead came. The excess is wiped away and the patina is allowed to set up for a short amount of time. To remove the residue from this step I'll wash the entire piece with soapy water, a sponge and a toothbrush run on all the solder joints paying special attention to heavily angled joints since this is where anything that doesn't belong tends to hide.
 I let the cleaned patina'd piece set overnight, the next day I polished all the joints to protect them using a couple of different carnauba based waxes which also cleans and the glass and gives it a nice sparkle.
~~~~~~~~~~~~~~~~~~~~~~~
I've got another leaf based design that I'll be starting on tomorrow. The leaves are much simpler in form and the overall size will be a bit smaller.