Showing posts with label stained glass cat face ornaments. Show all posts

Saturday, January 16, 2010

I've got me a new kitty cat

Nah, not the real life kinds~I've got plenty of love kittens roaming around. In addition to the 7 permanent insiders, there's a family of 4 stray kitties that I've been caring for and trying to find homes for--without much luck.
I recently designed this new Orange Tabby stained cat suncatcher and added it to my Etsy shop. This piece came about really by accident. Call it the miracle of slow dial up~~while I patiently wait for pictures to upload I have nothing really to do put sit here and doodle. That's where the idea for this one started, just a little 2 inch sketch.

I don't remember what came first-the butterfly or the cat, but now it really doesn't matter. After I played with the sketch a little bit and enlarged it I could see that the piece really needed something more. That's where the little daisy flower came in. The piece then made perfect sense to me: Curious kitty finds a butterfly feeding on a flower, gently picks it up so he can get a better look at it.
Now, the possibilities are endless--will it be a grey tabby and an orange butterfly next time, or should I do a big black kitty and a blue butterfly? So many ideas.

Black patina~what is this stuff? I use a bit of it and in my descriptions I always add that the metals in this piece, the solder and the lead, have been darkened with black patina. The label says that it contains nitric acid and selenium compounds-and look, its also a poison. I wonder sometimes what kind of strange ailments I'll come down with in the future by working with all these chemicals and heavy metals...

Applied with a q-tip to the solder and lead, the lines become dark and the shinny solder turns a deep dark grey, accentuating the solder lines and directing your eye to the beauty of the glass instead.

The piece is then cleaned again to remove any patina residue.
~~~~~~~~~~~~~~

With the addition of the new suncatcher, I had to build another Orange and White Tabby Cat. Out of curiosity, the husband asked-"How many of this cats have you done, crazy cat lady?" I dunno, I really don't keep track, but then I got real curious. So, I sat down and counted all the ones I've sold online, offline, special orders, through my studio, one that I traded and one that I gave away on my blog last year. This kitty is number 77! Ha~I really couldn't believe it. When number 100 comes around it will have to be extra special. I guess I have a little bit of time to think of what it will be.
The weather here has gotten much better in West Tennessee. We are now out of the deep freeze of last week, the temps are in the 50's and spring is just around the corner. Little daffodil sprouts are starting to poke up through the earth, a welcome sign of the renewal of spring.
Wherever you are, I hope you have a safe and happy week.

Wednesday, November 11, 2009

I am the crazy cat lady

My husband has been calling me the crazy cat lady for years now. Honestly, I really like this title.
I had an idea a few weeks ago to try some new colors with my stained glass kitty cat faces. I thought they might be cool to build in pinks and greens and yellows-its not even winter here and I'm already thinking of spring colors. I told a friend about my idea and she suggested that I try patchwork kitties-mix the colors up a bit. So, I gave it a try. This is the second Pastel Patchwork kitty that I have built and I have added this one to my Etsy shop. I just love them and I'm thankful that she suggested the idea, they are so fun and bright.

This kitty has very pale green eyes. I have another patchwork kitty that I've cut up and will have finished in the next few days. The new kitty will have aqua blue eyes and aqua blue glass along with other springtime colors.

I've also added an Orange Tabby to my shop. This one is so bright with some sun behind it--its like its on fire! The eyes of this one are an emerald green.

And-I've finally completed my Snowy Owl suncatcher, now I just need to get it packaged to ship. The whites are actually very bright, it looks like I've got some shadows from my backyard trees cutting across parts of it here. I'm very excited about this piece and hopefully I'll be able to recreate this and add it to my Etsy shop.
Hoping everyone has a wonderful week. The weather has been absolutely wonderful here in Tennessee.


Wednesday, October 7, 2009

I love black cats

Yes, I do-I love black cats~but then again, I love all cats!! I just added three new black cat ornaments to my Etsy shop. The first two are the fat face style-they are 5" wide. One has glowing amber eyes. The eyes are glass globs and after I get them soldered I hand paint the pupils so each is a little bit different. The amber eyed cat has the look in its eyes like my cat gets when there's no food in the bowl.

Here is the green eyed kitty. These glass globs are really light in color~almost a pale lime green.
And the last kitty has really cool blue eyes. I've never seen a blue eyed black cat in person, but I know they exist. For this cat, I narrowed the face a bit. I really like the shape of this one. I had another kitty~a blue eyed grey and white kitty all handcut, but I needed to order some replacement parts for my glass saw before I can go any further with getting that one done.

And here's some real black cat love~two of my black girls loving up to each other.


Saturday, August 8, 2009

I've been featured...and I've got a new kitty!

I'm so excited! One of my cat face ornaments has been featured with some other lovely kitty items on Mouchois' Saturday Shopping Blog. Stop by and see sweet Melvin on the blog here along with Mouchois' Etsy shop for wonderful kitty toys!

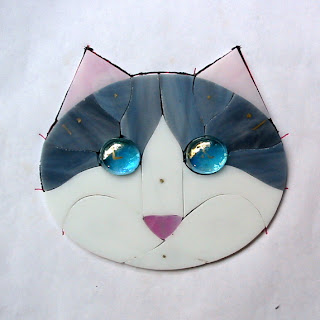
Here's the newest kitty in my Etsy shop. I try to make one at least once a month, soon I'll have to plan a week or two of kitty cat making. This latest kitty is grey and white with a pink nose pad and aqua blue eyes.

Here's the kitty that inspired me to start making these kitty faces. He's a stray that stays on the back porch of a house across the street from me and I've been caring for him for the past two years. He's kind of a rough wild kitty--likes to attack and to this day I wear leather gloves when I hand him his meal. He's scratched me more than once, but everyday when he sees me coming over to see him he gets all excited. Honestly, I look forward to seeing him every day, too.
One day while I dropped off his breakfast, it dawned on me that I had some glass globs that were the same stunning blue color as his eyes. I went back home and drew up the very first kitty face and put it together that day. Below are the basic steps involved in creating a cat face.


This is the basic pattern that I use. I've choosen two carribean blue glass globs for this kitty.

Here all of the different colored glass pieces have been cut out and fit together like a puzzle.

All of the glass pieces have been wrapped with copper foil, except for the outside edge.

First, one side is soldered together. The piece is then turned over and the back side is soldered.


Lead came is wrapped around the entire bottom of the kitty's face. A separate piece of lead came it fit over the top of the head and ears and these to pieces are then soldered together.

Black patina is applied to all the solder lines and lead. Next, I've painted the pupils onto the glass globs.

A small loop is soldered to the back of the piece and the kitty is ready to hang up.

Thanks so much for stopping by. Coming up shortly~I'm hoping to start work soon on a frog/lilypad/water lily/dragonfly suncatcher and I'll be posting all the steps involved here.


Monday, June 15, 2009

Sweet Mellie

Being commissioned for a project is such a wonderful feeling. Someone has trusted you to make something special for them. Sometimes those projects really have extra special meaning. This is the case with Sweet Mellie.

Last year, one of my flickr friends, Peggy Vandevier, asked if I could create stained glass cat face ornaments of her kitties. She's got some beautiful cats, but due to limitations of glass colors available I really couldn't make them to look right. Except for Mellie, I thought that I would be able to make her. Peggy then informed me that Mellie is a one-eyed kitty, perhaps I could leave that side of her face black. Honestly, I didn't know even though I had been looking at her kitties for a few months by then. I thought that the fur on this side of her face was so dark that the eye just didn't show. We both agreed that Mellie should be realistic and we agreed that the missing eye would be shut, as if Mellie were winking.
That's when Peggy told me about Mellie's rescue. Peggy's husband, Kurt, had found a little badly injured kitten beside his truck near a busy highway and brought it home to Peggy. Immediately, this little calico bundle was taken to the vet's. Upon examination it was found that this little kitten had a broken hind leg, internal injuries, a broken tail (it eventually fell off), one eye, she was malnourished and might not survive. But she did! With lots of love and care here's Mellie 9 years later.

Peggy says that Mellie is the sweetest cat ever, the smartest cat that she's ever had, she's cute and funny and very healthy. I think that Mellie is absolutely adorable. I always enjoy seeing Peggy's kitties on her photostream.

Here's Mellie and Ozzy another of Peggy's kitties getting ready to play. Being a big time cat lover with 7 rescued kitties myself, I'm so thankful that little Mellie was lucky enough to find such a loving home as this one.

Tuesday, May 26, 2009

Let's make us some kitties-step 7-paint it


Well, we're at the last step and almost done! Just one thing and that's to paint in the eyes. I use a gloss black enamel paint for the eyes. They can be a bit tricky. First, I'm not a painter by trade. Second, painting on a curved glass surface feels a bit odd. Third, I've got to try and get both eyes to look somewhat similar.


And here it is ready for photographs and a new place in my Etsy store.

Let's make us some kitties-step 6-patina it


In order to darken the lines of this cat, I'm using black patina. Patina is a chemical mixture that reacts with certain metals and gives them a superficial coating.


Here it is being applied with a cotton swap to the lead came. Care is taken not to slop it all over the place. The lead came along with all the solder lines are treated front and back.


Here is what the black kitty looks like with patina applied.


And and orange and white tabby that I've been working on at the same time.

Let's make us some kitties-step 5-wrap it


Whew, only a couple of more steps to go! The next thing we are going to do with this black kitty is to wrap it up with lead came. Lead came is available in various widths and channel depths and styles. For this project we are using "U" channel lead. Its actually shaped like the letter U. It is flexible but strong and adds quite a bit of stability to this piece.
First, I fit a piece for the area between the ears.


You can see in this picture a cross section of the lead came.


Next, I'll roll the cat face in a section of lead came. This helps to seat the glass in the channel groove.


Where the two sections of lead meet at the points of the ears...


...I solder this joint together.


Finally, I solder a jump ring to the back of the cat face. We're almost done. Next step, patina it.

Monday, May 25, 2009

Let's make us some kitties-step 4-solder it


We're ready to solder the black kitty together. Here we have everything we need for this step. Clockwise from the top-liquid flux, temperature controller-or rheostat (this regulates the soldering iron), solder iron in holder, flux brush, solder-I use 60/40 solder and a wet sponge for cleaning the solder tip.


I start by applying the liquid flux with the brush to small spots at first so that I can tack solder the pieces together. Sorry, there is no one here to help with pictures so there are no action shots!


Next, I apply the flux to all the copper foil joints and solder all the pieces together. There is a chemical reaction that takes place between the copper foil, the flux and hot melting solder. The melting solder forms a bead that cools quite quickly and creates a bond between the pieces of glass.


We allow the front side to cool, flip it over and solder the backside. Once this step is complete we can move to the next step-wrap it.

Let's make us some kitties-step 3-foil it


In the copper foil, or Tiffany method of working in stained glass, every glass piece is wrapped with self adhesive copper foil. Copper foil is available in various widths and thicknesses along with different color backings. For this project I'm using both 7/32" and 3/16" copper backed foils depending on the thickness of the glass pieces. For the glass glob eyes I use 1/4" thick black backed foil.


Copper foil shown with a burnishing tool.


The trick is to apply the foil evenly over the edge of the glass so that an equal amount remains to be folded over for both the front and the back of the piece since both sides will be soldered. This will assure that the solder lines look even.


Once the foil is applied, a burnishing tool is used to smooth the foil and to eliminate wrinkles and bubbles.


Here is just one of the pieces, the kitty nose. The pieces that are in the center of the project are wrapped completely around with foil. The pieces that are on the outside are wrapped only where they butt up to the neighboring piece as shown in the very first picture. Next, we can move to the next step--solder it.

Saturday, May 23, 2009

Let's make us some kitties-step 2-cut and grind


After the glue has set up between the paper pattern pieces and the glass I can go ahead and cut all the pieces of the cat apart. For simple glass hand cutting, I use a pistol grip cutter. Its not really cutting the glass, but scoring the glass, then the unwanted piece can be broke off.


This is how the kitty looks after hand cutting.


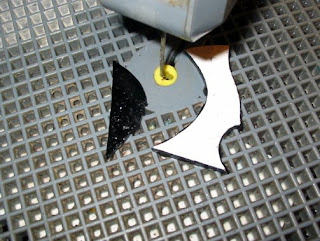
For more acute angles, I use a glass ring saw. Its a great tool that can cut glass and other materials with ease. Without this saw sharp angles would be difficult or even impossible to cut.


The next step in the process is to grind each piece of the puzzle to fit next to the neighboring piece tightly. Here is where a glass grinder comes into use. The glass piece is simply pressed against the rotating grinder head until the unwanted glass is removed.


All of the glass pieces are fit against the original pattern and checked to make sure that they all fit tight.


Here is a view of the cat the shows the texture of the glass. The next step in the process is to foil it.