Showing posts with label original stained glass designs. Show all posts
Saturday, August 13, 2011
Stained Glass Rainbow Butterfly~~new and improved version
Last week I had begun working on a new version of a Rainbow Butterfly in stained glass. I had come up with the original idea a couple of years ago and have done a few versions of it. For this new design I changed things up a bit by adding a lot more detail in the wings of the butterfly and also adding swirls and curves to the background--to give the piece more of a feeling of movement.
As in the previous butterflies I chose to use a textured glass made by the Spectrum Glass Company called Rough Rolled. It has a sparkly texture that really shimmers with sunlight or even objects behind it that reflect light. For the background pieces I was able to piroot through my leftover scrap box searching for odd parts to use~~as it turned out I was able to use seven different textures to surround the butterfly.
This was the very last rainbow butterfly that I had done before making the changes that I did. When working on the one above the thought came to me that I really wanted the colors to flow from the center outward--the only way to get that to work was to add more pieces to the project--which of course involves a lot more cuts and a lot of small pieces to wrap with foil. Also, even though I love the deep purple that I used its such a difficult color for me to photograph that I figured that I shouldn't use it again for a butterfly.
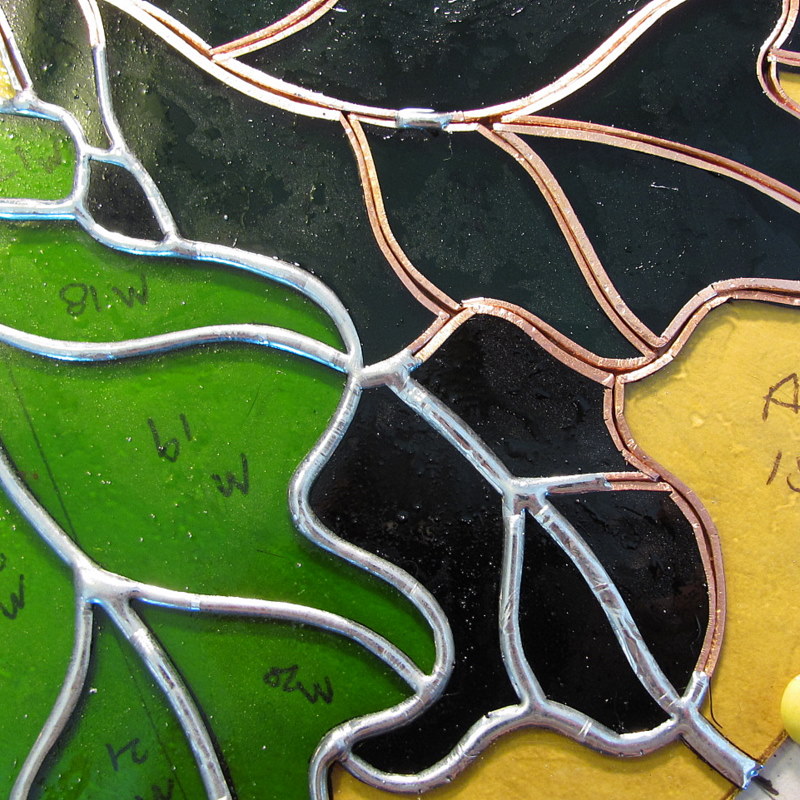
Shown here with all of the pieces for the project cut and about half way through the process of foiling. Even though some of the pieces were/are tiny this step seemed to move relatively quickly.
Here it was ready to be soldered together. When doing a piece like this with tiny parts its real easy to get globby and sloppy with the solder. Remember to bring your patience to the soldering party.
Completed this butterfly measures 12 inches wide by 10 1/2 inches tall, about 30.5cm by 26.5cm. Available for sale in my Etsy shop.
Friday, July 22, 2011
Stained Glass Oak Leaves Project~a woodland celebration
After the lead came frame was added, this piece measured at 13 3/4 inches diameter, right around 35cm.
I last posted about this piece a few days ago while I was half way through the process of foiling the pieces. Let's take a look at the remaining steps for this project.
All the pieces have been wrapped with copper foil, except for the outside edge which will be lead came framing a few steps from now. At this stage I'll pin the piece down with thumbtacks to keep it in place while the pieces are soldered together. I noticed that one piece of this puzzle was taking up a little bit more space then it was intended to have--it was taken out and a little bit of the glass removed so that it would fit better against the neighboring pieces.
Time to glue the puzzle together, or in this case its solder. A liquid chemical acid (left) will be brushed onto all the copper foiled edges. A lead/tin solder (right) will be what binds the pieces together and creates the joints.
Using a hot solder iron (right) that melts the solder to a high temperature, a bead is run over the copper foil joints that have been treated with the acid flux--by chemical reaction the solder is attracted only to the foil and the parts are then bound together.
Its important to keep the solder and the iron moving slowly yet continuously over the pieces as to avoid globs of solder which can occur easily especially where several pieces join together.
One side soldered completely. Lots and lots of crud left over from the solder process--this will be cleaned off thoroughly later, although a gentle wiping away of some of the gunk is in order. Now, the piece will be turned over and the back side will be completely soldered as well. BUT---this is the fun part~~~the piece can finally be picked up and looked at.
This will be the first time and I've seen what all of the hours of work have come to. Very very happy with things so far!
Back side soldered, the piece can now be cleaned thoroughly for the first time. Here, I'm using a powder called whiting, which is calcium carbonate. Brushed into the solder joints, it helps to absorb and residue leftover from the soldering process. It also cleans the glass as well.
Time to wrap it up. For the outer ring, I'm using what's called lead came--this is U shaped came as it resembles the letter "U". There's also "H" came that is used in leaded glass work--I don't use this in anything I do. There are a couple of different ways to purchase came, I've gone with the most economical method sold rolled onto a spool.
A measurement is taken of the circumference of the piece~~here right around 43 inches (just under 109cm) will be enough to wrap the outside. A length is cut off the roll of lead, laid out smooth and flat and cleaned off to remove any oxidation that might have formed.
There's a couple of different ways to approach wrapping the piece with the came. Mine is to face the U channel of the lead in an upward position and then to gently roll the center glass into the channel. Here, its been rolled and tacked down to a board using horse shoe nails to hold all in place for the next step.
Where the copper foiled joints of the glass meet the lead came outer ring I connect the two with solder to connect the ring and keep it in place. All of the joints are soldered this way on the backside only. On the front facing side I only solder the ring where the two ends have met and also where the rings that hold the piece will be put in place.
For smaller pieces its fine to attach a simple ring to for the purpose of hanging. For a larger and much heavier piece such as this I've created a ring with a 'tail'. The 'tail' end will be embedded with solder into the solder joint. This will create a hanging loop that is virtually impossible to remove short of cutting it off or reheating with an iron and removing.
To tone down the shiny silvery solder lines I've applied black patina to the metals. I've found that the easiest way to patina a piece is with a sponge dipped into the liquid patina then applied onto the solder lines and lead came. The excess is wiped away and the patina is allowed to set up for a short amount of time. To remove the residue from this step I'll wash the entire piece with soapy water, a sponge and a toothbrush run on all the solder joints paying special attention to heavily angled joints since this is where anything that doesn't belong tends to hide.
~~~~~~~~~~~~~~~~~~~~~~~
I've got another leaf based design that I'll be starting on tomorrow. The leaves are much simpler in form and the overall size will be a bit smaller.
Sunday, July 17, 2011
Oak leaves project~~things are moving along
~~~~~~~~~~~~~~~~~~~~~~~
Wednesday, July 13, 2011
Oak leaf project--finally underway
~~~~~~~~~~~~~~~~~~~~~~~~~
Sunday, March 7, 2010
New glass for this week--How about some red
This is a brand new design for my Etsy shop-- it started out as most of my creations do--scribbling and doodling, erasing and scribbling some more in a very small size and then recreating a pattern in a larger size.
Harmony Glass. I've dealt with them for a few years now and they are just fantastic--super fast shipping and excellent customer service. So, the idea was to use the jewels and alternate them with bigger pieces of glass in the same shape as the jewels.
~~~~~~~~~~~~~
~~~~~~~~~~~~~~
Spring is slowly starting to make its way here. Its been such a long cold winter but today we were finally able to open the house up for just a little while. Actually, just one window. Then it got too chilly and we had to light the woodstove back up! But, the kitties were very happy to fight over the window to get a sniff of the outdoors.
Wherever you are, have a safe and happy week. My daffodils are popping so I'll be taking some pics of them soon.
Monday, February 22, 2010
Sunny but slightly froggy in the morning
I recently added this Stained Glass Frog to my Etsy shop. This frog has appeared in a couple of different panels and suncatchers that I've built. The idea for a solitary frog in a small size came as a special requests from one of my Flickr friends. I'm always thankful for good ideas.
~~~~~~~~~~~~~~
Spring is finally happening in this part of the country-slowly but surely. My daffodils are finally starting to pop open in the yard. Soon, the birds will be singing and the trees will be budding out and the wonderful smell of springtime will fill the air.
Wherever you are have a safe and happy week. And watch where you're stepping, there might be a frog wanting to cross your path.
Thursday, February 18, 2010
Its almost time for hummingbirds
Spring is finally springing up here--one of my daffodils has started to open up just a bit. Can't wait for the wave of yellow happiness that these beautiful flowers create in the months ahead.
Wherever you are, have a safe and happy week. Look to the skies if you get a chance--you might be pleasantly surprised to see an awesome creature of nature.
Subscribe to:
Posts (Atom)