A few weeks ago, I met a most interesting duck at a local state park. I watched him as he would wait for fishing boats to be offloaded and then he would follow the boaters around the gentle cove but never venture out for to the main river. Around the cove he would swim, he was pretty fast about it. Finally, he came over to where I was at and I got to take a good look at him.
He's really a beauty--all black with feathers that are iridescent in the sun. His bill reminded me of a Mallard Duck, so I'm not sure if he's part domestic duck, part Mallard or what. There is a duck called an American Black Duck--but they don't look anything like this.
This duck got me thinking about bringing out an old pattern that I had done of a duck a few years back. I knew I wanted to make some changes to it before doing another. I played with the pattern a bit--made the cattails larger, changed the position of some of the grass and made those parts larger as well. One thing I wanted to do with the new duck was to use brighter colors for some of the features. The last duck I had done had darker colors which made it difficult to photograph.
The pattern I had developed was on a regular sized piece of paper-I enlarged it and got to making my copy. I thought it would be interesting to do something different with the eye. For that I chose to use a black glass glob, a/k/a glass gem, half marble. They are a bit larger than needed---I grinded the glob on all sides to fit and took a bit off the bottom of it as well so it wouldn't stick up way higher then the glass.
It was really very fun choosing all of the different colors for this piece. I thought also to use denser glass on the main features with the thought that this might be an interesting piece to hang on a wall since not everyone has big windows for big suncatchers.
After days of glass choosing, cutting, grinding the pieces and foiling them I was finally ready to solder everything together. This is an exciting time because once I have one side soldered I'll finally be able to pick the piece up and see what everything looks like together. The reverse side is then soldered and lead channel wrapped all the way around the piece.
I hung the duck up inside and thought it looked pretty good this way. It was then that I realized that I was not completely done~~~I still needed to hand paint some features onto the duck.
A little nostril and some lines by his webbed feet are what I added. I never realized how important this nostril is until I spent time watching that black duck. He seemed to blow air out of it when he had his bill in the water--kind of what people do when they swim.
I'm very happy with the outcome of this new
Mallard Duck design, available for sale in my
Etsy shop. This suncatcher panel measures 15 inches diameter, 38 cm.
 Spring is in the air so it just seemed natural to come up with a new design featuring one of my favorite spring time flowers. The idea for this piece actually started with the diamond shaped bevel that is in the center. Its been sitting in my supply cabinet for a few years, it was finally time to build something with it. The result is a combination of two of my favorite things--geometry with nature.
 I began playing with some ideas and scribbling in my little notebook. Lately some designs have started as tiny little sketches. Sometimes when I draw them at a large working size they don't look quite as good to me as the did in a tiny size. For the tulip plan the design elements came together really well at a large size.
When I was thinking about colors for the tulip suncatcher my original idea was to use violet purple for the flowers. But I really didn't want all four of them to be the same color and I couldn't figure out a good complimentary color if I chose to split them up. After searching my stock I decided red and yellow would work better, and since the flowers are two different colors I decided to make the leaves both hunter and emerald green.
I began playing with some ideas and scribbling in my little notebook. Lately some designs have started as tiny little sketches. Sometimes when I draw them at a large working size they don't look quite as good to me as the did in a tiny size. For the tulip plan the design elements came together really well at a large size.
When I was thinking about colors for the tulip suncatcher my original idea was to use violet purple for the flowers. But I really didn't want all four of them to be the same color and I couldn't figure out a good complimentary color if I chose to split them up. After searching my stock I decided red and yellow would work better, and since the flowers are two different colors I decided to make the leaves both hunter and emerald green.
 Lacking soom sophisticated tools I've learned to improvise with everyday objects. For outlining circles I use covers from the kitchen~~here the cover from the slow cooker is a perfect 10 inch round while the retired frying pan makes a 12 inch circle.
 Since the center of the design is a glass bevel I thought adding additional bevels to the border would be a nice touch. The problem was that the 1 inch bevels I planned to use are square but the border is curved. By grinding the inner and outer edge a bit I was able to make them fit. So glad I went this route.

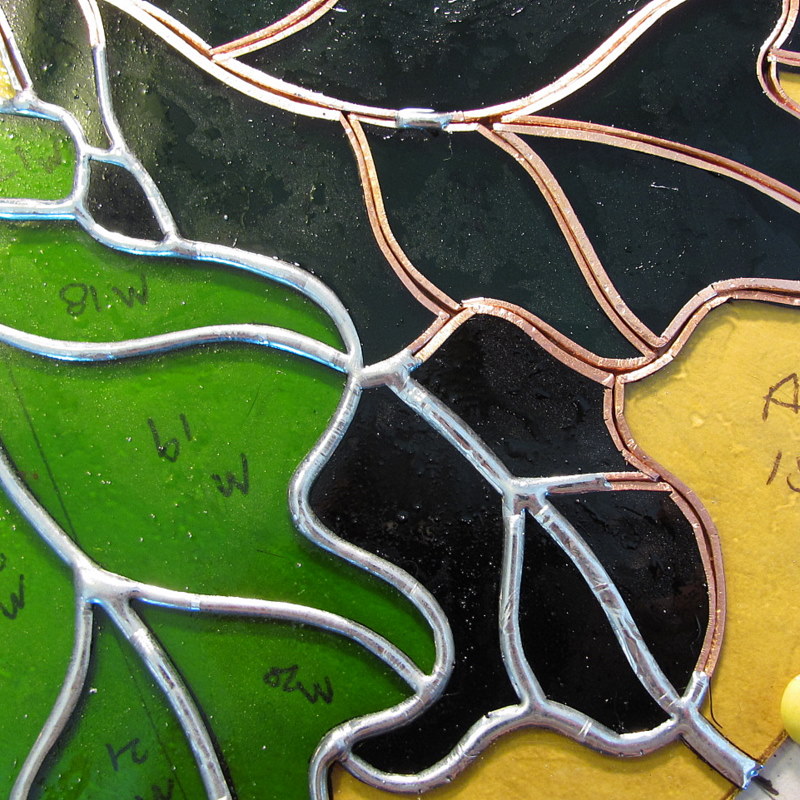
 All cutting and grinding of the pieces moved smoothly and I was able to work on the piece rather quickly. Of course I was very excited to see how everything blended together. Here is the first look off the paper pattern with one side soldered.
 Yesterday was the day to photograph it and list it in my Etsy shop. The skies were sunny which was ideal to get the best views of the suncatcher. It looks best in a window with good sun behind it, the colors of the piece really pop and the bevels sparkle and shine their prismatic beauty.
 Currently available, this tulip suncatcher measures 14 1/4 inches diameter, just over 36 cm. As always, chain will be included for hanging.